I found that the easiest way to remove the cabinets was to simply cut the nails (LOTS of nails...) with a reciprocating saw. I worked a pry-bar between the wall and cabinet enough to loosen the cabinets enough to get the saw blade in and then down they came.
I still haven't figured out if the blue paint seen here was primer or if the room was actually painted this color. I really really hope it was just primer. Over the blue is painted a coat of olive green - not a real improvement in my opinion... You can easily see the outline of where the cabinets were, even after cleaning the walls with de-greaser.
The black spot in the middle is the vent for the range hood.

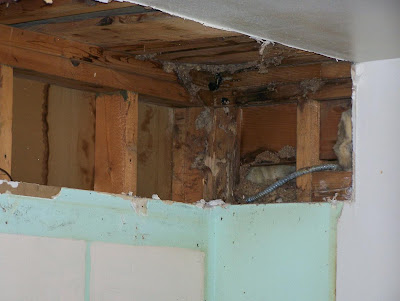
Tearing the soffits out wasn't too big of a project. I found that the best results were achieved by using the reciprocating saw to cut the inside corners by the ceiling and wall so that the drywall would break away easily as the inside structure was pulled apart. This kept the drywall from tearing.
The structure of the soffit was just 2x4 construction. I was concerned with hidden wiring, and actually got out with minimal wiring to deal with - just the one cable in the corner. I need to look at the structure of the wall to see if I can just notch the 2x4 to make room for it.
This corner also has some water damage from the previously leaking chimney flashing.

With the soffit removed, the kitchen does feel larger. I used some painter's tape to mark where the cabinets are going to be placed so I could make marks on the wall showing future outlet locations. The only outlet on that wall was used by the fridge and microwave, leaving nothing to power small appliances. When I finish this wall, the fridge and microwave will be on their own circuits and there will be a GFCI protected circuit for each counter top. The stove also has it's own circuit. Good thing I've got plenty of space open in the new electrical panel!

I started the electrical work by moving the plug which used to be for the fridge down low on the wall for the stove. I'm switching from an electric stove to a gas stove, so I can also remove the current 22ov outlet. Once the final location for the new stove is determined I can run the gas line for it. I got lucky in that the plug I moved was between the right studs and was just long enough to allow me to use it for the stove.
Now that the electrical line is run and tested for this outlet, I can patch the old outlet hole as well as the hole I made which was too low. Oops... Oh well, nobody will ever see it after the stove is in place and it'll be an easy patch.


