I posted another "before" picture of the half-bath a few days ago, showing the original toilet and nasty old flooring. Those were bad, but the cultured marble vanity, crappy base, pitted and leaking faucet, really complete the picture of an outdated bathroom. There was also an old-style medicine cabinet/mirror and 60's era light not pictured here. Overall, the only thing worth saving in this room was the oak trim around the door and window.
The vanity was easier to tear apart than I could have hoped for. The top wasn't glued down at all - only gravity held it in place. While tearing it apart (and I'll admit that I wasn't careful at all about how I did it) I broke the P-trap where it goes into the wall. This was actually a good thing, as I found that the drain line was about 75% blocked. After tearing it apart, I found out a little about the history of this bathroom. The first color on the walls was that light blue you can see little bits of in the following picture. You can see a lot more of it where the base molding was in the following pics as well. It's a pretty nasty color, in my opinion. After blue came an avocado green and then a layer of off-white. Next was that beautiful wallpaper. After the wallpaper was on the walls, the original pedestal or wall-mounted sink was replaced with the vanity I got the pleasure of destroying. Eventually the wallpaper not covered by the vanity base was removed and more off-white was applied. 20 years later, I get to ridicule it on the internet. Yay for me.
I had to break into the wall to replace part of the drain line. At this point, the wall is ready for drywall to cover my destruction and the hole left by the old medicine cabinet. I've also sanded the walls where the vanity was to try and even out the ridges left by the layers of old paint. New shut-offs were added to the supply lines for the faucet, as there previously were none.
The old linoleum was covered with a 1/4" layer of cement board, held in place with thinset cement and about 100 screws. On top of that was laid travertine tiles in two sizes for some interest in this small room. In this picture, I've got the tiles installed and have just finished pushing grout into the joints. 20 minutes later and the floor would be finished.
A couple of days later and the trim is back in place, the walls are painted, and the new toilet and sink are installed. I went with a somewhat classic style and tried to keep everything with the same look. There are still a few details to take care of, such as cutting the extra material from the toilet bolts, but it's essentially ready for action. We're extremely happy with how the flooring turned out, and plan on using the same tile in the kitchen, full bath, and entry of the house. For the full bath we'll probably use a heat-mat under the tile to take the chill out of it on cold winter mornings.
Saturday, March 31, 2007
Giving the House a New Entrance
The original door to the house has been weather beaten for decades due to the southern exposure. Having the glass storm door compounded the damage. The wood is heavily checked and loose on the door. The locks on the door are also quite old, and since we have no idea how many copies of the keys are floating around out there, it's time for some changes.
The storm door that came with the house is pretty dated, and not as secure as the style would indicate. It's pretty darn heavy and works fairly well, but the style is just nowhere near what we want so it'll have to go.
An few hours into the project and the new door is in place. It took a bunch of trimming along the top edge to make it fit, but the sides just slipped in between the bricks. Luckily, door sizes haven't changed in 45+ years! The urine-yellow color is the primer which comes standard on the door. I've got some high quality exterior paint for the door which I'll apply once it warms up a bit.
From the inside, the door makes a big difference in this corner of the living room. Since it isn't a dark wood (like the previous door) that corner looks larger and lighter. I still need to re-install the old trim and pull up the old laminate flooring. Speaking of that laminate, the original laminate is hidden under the equally ugly more current laminate. They'll both be removed to make room for travertine floor tile in the near future.
With the new main door installed, I could go ahead and add a new storm door. I prefer the look of not having a storm, but it really makes a difference when the weather is hot. As you can see, the storm has two glass panels. What we really like about this door is that when you lower the upper panel, a screen unrolls from above the top panel to take it's place. You can open it as much as needed for some airflow.
Friday, March 30, 2007
... And up to my eyes (Part 3)
Fake brick around a fake fireplace. What are the odds this masterpiece will survive the renovation? Not good I'll bet. The mantle is actually real stone, but I'll still destroy it all as I take it apart. Even my son wants to take a hammer to it - he makes me proud.
The mechanicals in the basement all work, but some of the pieces are in need of updating. The sump pump is older than me and doesn't have a check-valve in the line so every time it pumps out water, about half of it comes right back into the crock! The water softener needs to be disconnected and cleaned out since the old salt has formed a salt-bridge inside keeping it from working properly. Since we moved in a month ago, we've probably run more water through it than it's seen in over a year. The water heater on the far left of the picture is past it's life expectancy, so I expect to be replacing it soon. Fine with me, as it'll be a good selling feature for the house when we move. When I replace the sump pump, I plan to add a battery backup pump as well. The sump runs enough that it makes me worry what would happen if/when the power goes out for any length of time.
The laundry tub (or what's left of it) works, but the faucet is shot, it's got some large rust spots, and one leg is rusted away. Not too safe considering it probably weighs a few hundred pounds and is made of concrete! I already have a replacement sink, faucet, and drain so it'll be replaced soon.
As our home inspector was going through the place, he couldn't help but laugh at this wiring job. That hard-wired connection goes to the stove. Not what I'd call a "safe" job as you can't unplug the stove. The wire also doesn't have much of a drip line to it, so if anybody spills anything which gets behind the stove, it could drip down the wire and into the rigged junction box. Obviously this was not done by a professional electrician or anybody in possession of a clue. We'll remove this joke and the new stove will be set up for gas.
Back to the main floor, we see some lovely architecture from the 60's. The same detail is found by the front door. Both areas will be torn out and modernized when I start renovating these areas.
I'm in it past my neck.. (Part 2)
From the outside, you can't tell just how funky this place has been over the years. In my son's bedroom I found traces of old paint which were saved by window treatment brackets. That peach color isn't my favorite, but by compared to the blue it was covered with...! Yes, all four walls were painted that color blue. How bad did it look?
Imagine living in this closet! That's the same blue. This color is NOT in our long-term plan for the house. I wonder if the people who picked colors for this place were imbeciles or if they were all just color blind.
In my daughter's room I found traces of another blue used in the past. The master bedroom and the half-bath were painted this lighter shade of blue at some time. Not much of an improvement over the darker shade, and still nothing I'd ever want on my walls.
The front closet holds another classic color for us - piss yellow. Again, not a color we plan on keeping! I haven't found evidence (yet) as to what the rest of the living room this closet is in was painted yet, but I can't believe that they would have used this color for the main room. Then again, I can't believe the blue paint used in the other rooms, so anything is possible.
In the half-bath, ugly is more than paint deep. The toilet is the original 190 gallon tank version - flush a turd in the morning and by lunch the tank is filled and ready. The vanity was added about 20 years ago, and the linoleum is original (I think). Other than that, the room is perfect. This will be the first room we tackle, as it's not a necessary room for us and it'll give me a good idea as to what other items I'll need to do the full bath. As I buy supplies for this room, I'll just buy the extra pieces needed for the full bathroom which should save me plenty of trips to the store later on.
Where to begin? (Part 1)
I'm getting tired of the limitations and format of my old website, which was really setup to follow work I was doing on cars & trucks. The work I am doing now on my house now really didn't seem to fit, so I'm giving blog creation a shot. The plan is to document (mostly for my own amusement) the work my wife and (mostly) I do in taking a 1962 ranch from "dated" to "outstanding".
When we started looking for a new house, we wanted something a little older and closer to work. It also needed to be what most would consider a "fixer upper". My goal is to take the money we save by buying a place in need of work and sinking that money back into it in updates. In theory, this should boost the value of the place quite a bit helping us build equity quickly. We found a couple of places we wanted to put offers in on, but they were all sold before we could have an offer written. Since our offer would be contingent on our selling our existing house first, we wouldn't have a great chance at getting the house we want if we couldn't unload the existing place first. As luck would have it, we accepted an offer on our place just over a month after listing it (not bad considering we listed it just before Christmas) and also found a place which fit our needs vacant and ready to go. It was more expensive than we wanted, but it was too good of a deal to pass up.
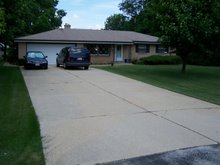
Here's the starting point - a brick ranch in solid condition:
What kind of work does it need? Well, it hasn't been updated in at least 20 years. The paint is old, the carpet is dated and ugly, the kitchen and bathroom flooring is shot, the kitchen is out of date, there is no dish washer or disposal, the roof needs to be replaced, and the bathrooms are nasty. Other than that, it's in pretty good shape! Don't believe me? Here are a couple of additional pictures showing how dated the place is/was:
The kitchen
The Living Room
The Family Room (2nd Living Room??)
Brown carpet, fake brick, fake fireplace, and wood paneling. Yeah, that's going to change. Over the next few days/weeks/years, I'll try to update this blog to reflect the work which is being done to update the house.
Subscribe to:
Posts (Atom)