Monday, February 25, 2008

A Shocking Update

Well, not shocking for me, because I had hired-guns do the work for me. That's right, the electrical upgrade has finally been done! By professionals with trucks, tools, and permits! 4 electricians, in fact. It took about 6-1/2 hours total for the whole job.

To recap for those who don't know and who can't be bothered to read about it in my previous posts, the electrical system in my house was maxed out and ready to be retired. The panel was original to the house and provided 100 amp service. There was no room for the additional circuits I need to continue the remodel.

Attached to this "Old and Busted" panel is a box which used to control an electric water heater. The theory was that the electric company would turn the heater on and off as needed only during peak usage times, saving you money. We had one of these in the house I grew up (or at least got older) in. I don't recall my dad doing cartwheels with joy over his savings, and I think these things faded away. Either way, it's an empty box.


Speaking of Old and Busted, here where we started with the service on the outside of the house. The original meter with a crappy & rusty well worn conduit, bringing power into the house below grade. Naaah, a little rust on the pipe won't compromise it's strength, will it? The gray box to the right is for the cable service.


Well above ground, the electricians started by running heavier wire which connected to the wires serviced by the electric company. A new mast-head was installed and the existing down-tube was used so no roofing needed to be done. The pipe at this end was large enough for the heavy wires needed for 200 amps.


Old and Busted meter box was replaced by New Hotness meter box. A larger diameter (and not rusted) pipe now brings the heavy wires in above grade. Everything below grade was cemented up to keep water out - a good idea in my book! The cable box was relocated to make room for this new larger box.


All work outside is now complete. I had an electrical outlet added outside, since there wasn't one before. It's got a large weather-proof box and is also a GFCI outlet. After the inspection I can replace the dirt moved to dig out the old pipe. Two new ground rods were installed and tied in with the old ground rod.


Moving inside, the old box was pulled from the wall to make room for this baby! Capable of 200 amps of juice. I'm somewhat certain that this picture was taken before they finished the install.


Here we go, "New Hotness" all buttoned up and ready for action! The little box to the right of the panel is a whole-house surge suppression system. An outlet just below the panel was added for the washer & dryer. Previously I had to plug the dryer in through an extension cord - not a good idea. I've got a lot of room to expand with this new panel, and the best thing about it is that the circuits are actually labeled with correct descriptions! At least half of the breakers on the old panel were labeled "Pump". The PO must have had some weird pump-fetish...


Remember this little gem? The PO thought this was a good way to wire the electric stove.


Here's a closer look. Yes, that's electrical tape wrapped around the cord to "protect" it. Before opening these boxes to check what kind of wiring fiasco was inside, the main electrician I was working with guessed that the wires were just wire-nutted together, giving power to the stove and the old electric fireplace I tore out on one circuit.


What he found in the box surprised him. The larger of the two boxes was actually a small fuse box, something most home-owners wouldn't have access to. He figures that whoever did this had access to material, such as a maintenance guy would, but didn't know/care enough about code to actually spend the little extra time to do the job right.

In the following picture you can see the extra wire added to the center terminal on the back of the stove. My electrician took this as proof that either the PO had help or kinda knew what he was doing (my money is on "he had help"), because this wire blah blah blah blah (I have no idea what he said/meant). Something about tying the neutral to ground or something like that.


I asked him to clean it up enough to pass inspection. I didn't want any more money than needed spent on it because it's going to get ripped out in a month or so when I get crackin' on the kitchen remodel. He installed new wiring, cleaned up the mess inside the little boxes, and I'm good to go here. It's still not as pretty as I'd like, but pretty costs more. They also installed the plug in a bad location behind the stove, forcing the stove to be away from the wall by about 3". Again, I don't care because it's temporary. No sense in having them waste their time to re-do it if it's not going to stay.


Trail Mix anyone? With a side order of 40 years of accumulated grease splatter? Yum yum, gimme some! When we moved the stove out (possibly the first time it's been moved in over a decade) I threw up a little in my mouth from the site of what greeted me. Yeah, like yours is sooo much cleaner...


Still to be done: There are two breakers which we haven't been able to identify yet. A 20 amp and a 15 amp. I haven't gone through the house yet checking each outlet, but that's next. We figure that at some time in the past the PO did some remodeling (HA!) and maybe added an outlet or two. Until I figure out where those breakers control, the breakers are off. That should make it easier to find the dead circuits so I can label 'em.

Saturday, February 23, 2008

Bring it on, Mother Nature!

I'm calling Mother Nature out, and daring her to bring her A-game with some snow. Any normal person wants winter to end, the snow to melt, and the ice to disappear.

Newsflash, I'm not normal.

I'm also itching to try out the new (to me) get-away vehicle, a '95 Jeep Cherokee which should be plenty capable of carrying any home renovation material I've got planned.


Nothing fancy, and far fewer bells & whistles than the previous get-away minivan-of-death. Fine with me, as that means less crap to go wrong. Power windows, locks, seats, etc are fine when a car is new, but after a few years, good luck with all those electronics. Ask me how I know...

It's been years since I've had 4wd, and I remember how much fun it was being able to go through just about anything nature brought. The minivan-of-death wasn't bad in the snow, but considering I leave for work well before the all the roads get plowed in the morning, this should make the commute a little easier.

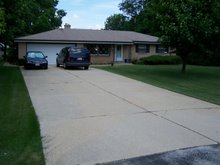
The only down-side of getting the Jeep is now my driveway is starting to look like a used-car lot. I've got the two minivans-of-death out front along with the red GMC in the background which I'm storing for my dad for 3-4 more weeks, plus the Jeep. One more car in the garage rounds it out.

All of 'em run and none are up on blocks, so I'm not quite to red-neck status. Yet.

So once again, Mother Nature, get your ass moving and bring the snow. If you've got the guts.

Tuesday, February 19, 2008

And Now, for Something Completely Different

Two topics today, completely unrelated to home renovations. Also unrelated to each other, but also related to each other. Makes no sense? It will.

First, the company I work for finally took delivery of the remaining Christmas gifts that were given out to employees in December. In December we were given a couple of games, a big tin of popcorn, and a check. We were told there were to be more games, but they couldn't get 300+ copies of each in time, so they'd come later. Today was later. Catchphrase and the DVD version of Are You Smarter than a 5th Grader.

While looking at the DVD box for "5th Grader", I noticed something:


Quite honestly, if you look at a little box and expect there to be a DVD player or a TV in the box with the DVD, you are barely smart enough to be considered human, much less smarter than a 5th grader.

It's sad that we actually need disclaimers on stuff like this...

Rant #2: today was the primary election in Wisconsin, and I am sure I am not alone in saying this: "Dear politicians, now that you're done telling us how your opponent is a big fat smelly liar who molests chipmunks, please get the hell out of our state and take your TV and print ads with you."

How are these unrelated topics related? Because politicians keep treating us like we're all 5th graders. Forget the issues, it's all about popularity and soundbites.

The main one which bugs me for some stupid reason was watching Hillary a few days ago talking to a local Wisconsin reporter, blathering on and on about how she went to the Wisconsin Dells when she was younger. Whoop-de-do. So did I, so maybe I should be a write-in contestant in the state.

Blah blah blah, I like cheese, vote for me.

Saturday, February 16, 2008

Why Ceiling Paint Choice is so Important

Anybody who has looked at all the differences in paints has probably also been surprised at just how many choices there are. Flat, Eggshell, Semi-Gloss, Gloss, etc.

On walls, flat paints often look great, but don't stand up well to abuse and can be hard to scrub. Glossy paints are easier to maintain, but don't look "right" on many walls.

When it comes to bathrooms and kitchens you also have to consider how the paint looks, but also how easy it will be to clean and how it'll hold up to moisture.

A few weeks ago I posted a picture of the grease-buffet that is my kitchen ceiling above the stove. At that time, I was planning to try a few different cleaners to see what worked best for built-up grease.

I had some time to kill today so I figured this would a good day to give it a shot. The grease on the ceiling has probably been building up for at least a decade, and it was my guess that it wasn't going to go without a fight.

Wrong!

I started the cleaning with a standard Clorox cleaning wipe, and found that it worked perfectly well. The only down-side was that the wipes aren't that big and therefore didn't last that long. Here's the result from one wipe:


The ceiling had been painted in the past with what appears to be a Semi-Gloss paint. It's got at least a half-dozen coats of paint, so the sand texture is pretty smooth making it easy to clean. If it were a flat white there is no way it would have been this easy.

Now I'm pissed at myself for living with this disgusting mess on the ceiling for so long. If I had known it was going to clean up this easily I would have done it a year ago.

Thursday, February 7, 2008

One of my Biggest Fans

Replacing a fan - an easy job that makes a big difference on the look of a room. Unless you're incompetent when it comes to all things electrical, like the previous owner of my house.

The house came with three ceiling fans, each one uglier than the last. All three were the same style, and the kitchen fan even included some hideous 80's style lighting.

With yesterday's Blizzard-of-Death-'08 bearing down on us I took a break from playing with the Snowblower-of-Death and replaced the fugly-ass fan in the living room. You can tell by the paint around the trim that I took lots of care when I painted the ceiling.


I'm not about to do a step-by-step on how to change a ceiling fan. Fact is, if you need to find help from me to do anything, you're in more trouble than you know.

At 6'3" (6'8" in my favorite pumps) I wanted a fan that also hugged the ceiling more. Into the picture is a new Hunter fan. It came with a God-awful light kit which I decided to break and throw away.


Ceiling fan tips:
- Push the air up into the ceiling in the winter to force warm air in the rest of the room down.
- Push air down from the fan in the summer to make it feel cooler.
- Or maybe I've got those two backwards.
- Sharpen the edges of the blades or line them with razor blades if you really want to create a spinning vortex of death.
- Ceiling fans are usually not strong enough to support the full weight of a noose and adult unless you install additional blocking in the ceiling.
- Rewiring the fan for faster operation will never get your house airborne. You'll have to join the Mile High club some other way.

Wednesday, February 6, 2008

Now THAT's a Snow Job!

Storm of the decade.

The "perfect" storm.

Blizzard.

Whatever you want to call it, there's a whole sh1t-load of snow on the ground which wasn't here 24 hours ago.

Some areas are expecting 16-20". I'm guessing I'll end up with around 14" of heavy, wet snow. Luckily I remembered to hose the inside of the snow-discharge chute with WD-40 before starting snow-removal, or I'd be running into jam after jam in the snowblower.

The snow started somewhat light yesterday afternoon. By bedtime we had around 4". This morning around 5-6", and the storm was looking like it might not hit as bad as expected. Weathermen were still promising a huge storm, but they've been wrong before.

Either way, schools were closed and the kids were staying home. I was in to work this morning at 6:30, planning to take a half-day. I got home and started snow-blowing at about noon, removing around 8" of snow.

3 hours later I had to do it again, removing around 6" of new snow.

And it's still snowing, so I'm guessing that I'll break out the snow blower one more time tonight.

The sick thing is that I actually like it. The snow looks great when it's fresh, and the house feels nice and warm after busting ass removing snow from the driveway.

Unfortunately, this means just one more delay in getting the electrical system upgraded. Every time we have it scheduled, the weather screws up the plans. Go figure...

Tuesday, February 5, 2008

Hanging an Ikea Cabinet is Easy (So Far)

Once I actually start the real installation work on my cabinets, I want it to be as easy as possible. I've never installed cabinets before and the last thing I want to do is get stuck half-way through because of missing parts.

I figured that I will take some time while waiting for the electrical and plumbing upgrades and hang the cabinet I assembled the other day.

The Ikea literature makes it look easy, but then again why would they possibly make it look hard to do?

Step one was to find the high spot on the floor and measure up from there. A couple of lines are made on the wall, and the track shown here leaning against the wall is then mounted. Normally this track would be cut to length, but since I'm just doing this as a mock-up, I'm leaving it full length.


The cabinets are held to the track with these sliding metal bolts/glides.


With these sliding bolts installed, the cabinets can be slid left/right as needed for aligning the cabinet. Minor adjustments can be made up/down as needed as well.


From the inside of the cabinet, you can see how the cabinet box is held to the track with a nut and clip on each side.


From the side, you can see how the cabinet box is designed to be held straight, while straddling the track. The top and bottom of the "box" extend back fully to the wall while the sides are open for the track, wiring, etc.


With the box mounted, the doors easily clip into place. Shown here is the recommended mounting height.


Covers for the mounting hardware are included, and they slide in place.


After about 60 seconds of tweaking the hinges, the bottom edges of the doors line up nicely.


Not so for the handles. I didn't do a good enough job in drilling the holes, so on each door the right handle hole is slightly higher than the left. It'll take about 3 minutes to fix, but when it comes time to do all the handles I'm going to build or buy a handle jig. This isn't noticeable, but I know it's not right and it bothers me.


From the recommended mounting height, I end up with about 3-1/2" between the top of the cabinet and the ceiling. While that works, I think it's a little too much. My plan is to move the cabinets up about 1 to 1-1/2" so I can use a smaller filler strip to cover the gap. This will also give me more clearance above the counter tops. Before I make this decision for sure though I'll build one of the larger cabinets and see how it lines up with our current cabinets.


At this point, the cabinet is pretty bare looking. There are no side-trim pieces installed and the trim along the bottom has not been installed.