Saturday, June 30, 2007

Stupid Window Tricks, Part 2

I'm on a posting frenzy today. I recently posted how I as able to update the look of my windows by removing some old 60's design elements. Well, today I learned a little more about the old windows. There are a couple of latches on the top sash which when released, appear to allow the top sash to be moved in some way. In what way, I wasn't sure until today. I didn't know if they just allowed the glass to drop or to be completely removed for some reason. This afternoon, I had removed one of the screens to get ready to replace the old screening. While the screen was out, I flipped the levers and the whole top sash tilted out. Not for cleaning, but for airflow. Why you'd use that instead of the lower sash (which has the screen) I don't know, but it's still kind of cool. The few windows I've tried so far move easily and were not painted shut, which surprises me to no end. Considering I don't want bugs in the house, I don't think I'll be using this window feature a whole lot.


Not shown in these pictures is the before & after difference after replacing the old screens. The screen frames were a little different than I had worked on before, but it's not like replacing screens is rocket science. The old screens were gunked up and nasty. The new screens (I used metal instead of the cheaper vinyl screen) almost disappear compared to the old ones.

Raise the Roof!

Now that school is out for the year, I've got a friend who's a teacher coming over to give me a hand with my roof. He does roofing & siding jobs in the summer as a way to keep his wife happy with the extra income. Actually, it supports his golf habit. I'm expecting to remove two layers of shingles, which should be fun. I know there are two small leaks to deal with, one in the garage (water slowly drips onto the concrete floor - not a big worry) and one around the chimney (no showing water damage inside, but there is evidence of a leak when you look from in the attic). I'll add a full ridge vent and remove some unneeded vents on the back of the house. I'll also add at least one tube-light (similar to a skylight) to help light the hallway and probably another for the main bathroom. The gutters need to be re-hung as well to make them flow properly, so this is as good a time as any to do that.

I'm willing to bet that the roof has never had shingles removed. Figuring that most shingles have around a 20-25 year life, and the top layer looks to be at least 25 years old, that would account for everything on the roof right now. The top layer is pretty brittle and curling in spots, so I hope it comes off easily...

More 60's Style Bites the Dust

As I was re-doing my daughter's bedroom, I took the time to look more closely at our windows. All windows across the front of the house had an insert in them which was laid out like a wine rack - diagonal mesh, basically. You can see what I mean easily in this winter shot of the front of the house:


We hated that design with a passion, but figured we were stuck with it until we got time & money to replace the windows. As I was looking at the windows in my daughter's room, I noticed some small clips on the inside pane of glass, as well as some slide clips on the ugly insert. Being the super-genius that I am, I figured that if the glass could be removed without breaking the clips, I could remove the ugly. And so it happened. Two clips have broken so far due to being brittle with age, but the inserts are gone! I didn't take a proper "before" picture, as the wife and I were too happy about just being able to remove these damn things. Here's basically what we started with (ignore the ugly paint choice - my daughter is 9 and it was her choice):


A few minutes later and we're left with "normal" windows. Best part is now we don't have to replace the windows just to update the look of the house! There are two windows, however, which have the glass cracked on the outside pane which I'll have to replace and reglaze at some time in the future. Still better than replacing the whole window though. I consider this a 10 minute facelift which removed at least 10 years of age from the house.


On an unrelated note, does the Project Tracker I have on this blog show up properly on people's computers? It works fine for me at home, but at work it doesn't show any detail properly. Maybe due to a firewall??

Tuesday, June 26, 2007

The Devil is in the Detail

Yesterday I figured I'd have my daughter sleeping in her own bed tonight, after I got the electrical outlets changed, the floor cleaned, etc. Well, considering I "work" for a living my time is limited. It took an hour to change outlets, another hour to remove old crappy window blinds and clean the glass, etc. By the time all is said and done, she's sleeping on the couch again tonight. Good thing she likes it...

Monday, June 25, 2007

Wheel Grease, Part 2

From the time we purchased this house, we knew there were hardwood floors hidden under the carpeting in two of the three bedrooms. The third room with exposed hardwood has a floor which is in decent shape. It's a bit worn, but doesn't need to be refinished. The big question is what kind of shape is the hidden wood in? Oh, and I removed all the tape and paper protecting the woodwork and windows after painting. Here is where we start the adventure into the unknown: crappy carpet on the floors.


How crappy is it? Well, the main carpet is in OK shape - it's not worn through or anything like that, but it's skid-mark brown. In the closet was what may have been original carpet from the house or a remnant added at a later date. Below is the wonderful closet carpet which was tacked down around the whole perimeter of the closet. Orange and brown isn't much better than all brown.


As I tear out the above pictured section, I'm hopeful. It looks good, and only has the staple holes for damage. The carpet in the closet was really a bitch to remove due to all those small staples, but I managed. I rule, remember.


So far, so good. The carpet is half-removed except for the tack-strips. Still no damage which would explain why the previous owners covered the flooring. No water marks, no rot, no pet stains. Even the carpet looks clean underneath, which surprises me. The padding is still in good shape considering it's age. I'm more worried than ever as to what may be hiding on the still covered floor.


Amazing enough, NO DAMAGE! Just normal wear & tear, but not even enough to warrant refinishing the floor. I'll give it a good cleaning and then put something on it to protect it's finish and call it a day. There aren't even any noticeable wear patterns in the floor. This means the floor still covered with carpet in the master bedroom will be in crap condition... In all, painting and removal/clean up of the floor took 5 hours, including breaks while paint dried. Tomorrow I'll install the new outlets and switch plates, put in the new blinds, and have it ready for my daughter to spend her first night in the "new" room. It's only a guess, but I would estimate that the changes I made to this one room have increased the value on the house by over $1,000.00. Once all three bedrooms are done I'd bet the value goes up by around $5,000.00 total. They just plain look soooooo much better it'd be a solid selling point.

Squeeky Wheel Gets the Grease

My daughter has been asking (bugging, whining, and complaining) long enough about her bedroom. The carpet is ugly, the paint is horrible, and there are nail holes everywhere. If all I were going to do is paint and remove the carpet, life would be easy. There are enough dings and layers of paint meaning the best option for me is to re-texture before painting. This brings things up to current "style" as well. Sunday morning, everything was removed from the room.

Here's the starting point. I've already removed the closet doors and the shelving. Nail holes were patched.


All the trim was covered up, but I'm leaving the carpet in place (for now) because it's old and crappy. It's also going to protect the hardwood flooring which was covered up a decade or two ago. At this point, I'm just hoping that it's still in good shape. Either way, it'll still be better than the current carpet.


The next big step is to texture the walls. I tried a different mix than I had used previously. Up till now, I've always taken standard drywall compound in gallon buckets and thinned it with water to the consistency I want. This time, I got the powder mix. This should be less expensive overall, and I don't have to worry about using the compound before it dries on me. So far, it's not bad. I think the mix was a little thick, but still workable. Here, you can see the larger "splats" which are still wet on the wall. As it dries, it turns off-white and matches the current paint.


Paint the walls with a brush and roller? No way, a sprayer is the way to go! I used this one a few years back in renovating a condo and love it. In the time it takes to paint the four walls in one bedroom I was able to paint two bedrooms, a hallway, two bathrooms, a living an dining room, and a kitchen. All walls and all ceilings. Seriously, that's not an exaggeration as to how fast it is. For as fast as it is to paint, it is just about as long to clean. For a small room (bathroom), I'd probably just use a roller and brush.


10 minutes and a 1-1/2 gallon of primer later, the room is done and drying. The annoying thing with how fast the sprayer is is how long I have to sit and wait for the paint to dry before doing the next color. I gave it 1/2 hour and sprayed the ceiling white. I'm giving it a few hours before hitting the walls with the color. The sprayer uses a bit more paint than by using a roller, as there is overspray and all the paint in the hose. Either way, for a large room or series of rooms, the extra cost is wort it. I find that I also get a smoother appearance than compared to rolling paint.

Saturday, June 23, 2007

It's About Time to Take a New Outdoor Picture

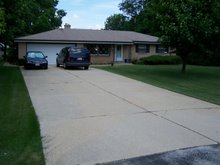
The header picture on my blog was taken when we were in the process of buying the house. That was in February, when there was a foot of snow on the ground. Well, it's summer (sort of), so it's about time that I update the picture. It's hard to tell, but the driveway is actually pretty large. Two cars wide and at least long enough to park 6 full size cars, plus 2 more in the garage (if it weren't full of stuff already).

That was then:


This is now:


Part of the process of getting the walls ready for new texture and paint includes patching the holes in the walls from where the half-walls were removed. This is in the front entrance, where a 1/4 height wall was removed. It still needs a little sanding and a final skim coat of drywall compound. My dad was in town for the second time since we purchased the place and asked why we had a section of carpet removed. He forgot that there were walls there, as it looks "normal" without them. Without knowing (remembering) that there was once a wall here, it just looks like the carpet is screwed up. That's what I wanted.

Saturday, June 16, 2007

Although the tile has been down for a few weeks now, I'm finally getting around to adding the pictures to the blog. As it always is with tile, there is a lot of work to doing the grout. It goes on reasonably quickly, but it takes a lot of effort and time to clean the tiles and remove excess grout. When it's done, you hopefully find it was all worth the effort. In this case, it was. Since these pics were taken, I've re-installed the trim and baseboard. I had planned on prepping the walls and spraying the texture today, but then I remembered I still needed to patch the wall where I removed the half-wall, so I did that instead. It's got the preliminary layer of mud and corner beads installed, but I need to let it dry overnight before giving it the final coat of mud.


Here is where the new 12" tiles meet the half-bath and the 2" and 8" tile. I'm happy with the transition, although 98% of the people who see it in the future will probably not even notice the difference in tile size. Those bastards.


I've finally found a solution to the rust in the water which has been making a mess of the toilet tanks. I poured a little Iron Out in the tank last night and expected a little change this morning. I was very surprised to see that ALL the rust staining in the tank was gone. I mean ALL gone, to the point where the tank looks new again (which it should, since it's only 3 months old). Yesterday it looked like it was installed a decade ago, today it's perfect. I've been trying it on the remaining old toilet, and it's been working well at removing 40+ years of staining. I expect that a few more treatments and it'll be in great shape again. At least good enough condition that I might almost feel guilty at throwing that old piece of crap out in the near future.

Saturday, June 2, 2007

Grout - It's not Just for Breakfast Anymore

The tile has been in for a week, and I haven't gotten around to grouting it in that time. Too many other little projects got in the way, including a Friday night baseball game - Brewers over the Marlins. The company my wife and I work for had a contest which my team took 2nd place in. The prize was tickets to the game and seats in one of the luxury suites. Plenty of catered food, booze and soda, and a Don Sutton bobble-head doll. This was actually the first game I've seen at Miller Park, since it replaced the old County Stadium. Got some time to hob-nob with the company CEO and a few dozen other people. Much better than busting my back grouting!

(Pardon the poor picture quality. This picture was taken on my camera phone)


By Saturday afternoon, I finally got around to taking care of the grouting of the tile at the front entrance. I haven't done the larger area in the kitchen yet, but hopefully that will be done tomorrow. The front entrance tile used almost a full 9 pound bucket of sanded grout. That same 9 pounds of grout should cover a larger area when I do the kitchen, as I'm grouting around 12" tiles so there is just plain less to grout per square foot. Over the next few days, I'll re-moisten the grout to help it cure a little more slowly. Next weekend, I'll seal it and consider it done.